Saturday, December 11, 2010
Christmas Traditions
I just can't resist vintage Christmas decorations. My largest Nativity set is displayed on the buffet in my dining room. Most of the Nativity figures are from a set I purchased from an antique dealer 25 years ago. The colors are vibrant and rich. This set is German, as the figures are not as twisted as the Nativity sets made in Italy. I have added German Putz animals to the set and a few German angels as well.
My stable is not as old. I would love to find an old German stable that was the right scale. I collected smaller sets from the thrift stores for each of my children and they would always set them up in their bedrooms under there own special Christmas tree. They would move the animals around and never put Baby Jesus in until December 24th. These are the wonderful memories of Christmas time! Figures for vintage Nativity sets were sold at Woolworth's and Five and Dime stores for less than a dollar. Families would buy a new figure each year. I can just imagine a family going downtown to look at the beautifully decorated windows and Christmas decorations and carefully selecting a new figure for their creche.
My set has some unique figures. I even have a camp fire with a soup pot for the shepherds.
If I had to pick a favorite it would be the three Wisemen and the camel. The camel is very large and beautifully painted. The set includes a camel driver as well. I added the two German composition camels. Another very unusual piece to this Nativity set is the palm tree with its wax leaves. It is so fragile and the only person that is allowed to touch it is me!
We are under a blizzard warning until tomorrow night. It rained a bit before the snow hit so the trees are just beautiful. I'm going to try my hand at "Winter Wonderland" pictures tomorrow. I spent most of the day decorating my tree in the living room with my antique ornaments. I have put several hundred ornaments on and only have about 100 more to go. I can hardly wait to share photos.
Monday, December 6, 2010
Ho Ho Ho Santa Vignettes
I have always loved Christmas. As a little girl, I would pass the time before Christmas by making new decorations or making gifts for my family. You wouldn't believe my collection of vintage Christmas decorations. I have a tree of some sort in every room of my house. Each room is decorated a little bit differently and I generally tend to put all one sort of collectible together. Small vintage collectibles make more of a statement when they are grouped. I just finished my den using my vintage and handmade Santas.
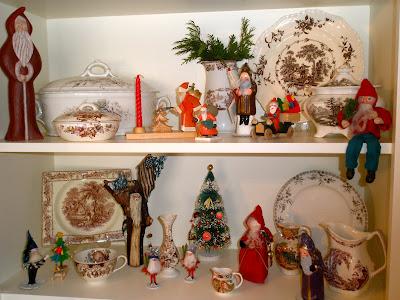
The room has a built in desk unit with bookshelves. I normally use the shelves to just display my collection of transferware. At Christmas I nestle the Santa figures in among the dishes and add a few vintage bottle brush trees and fresh cedar.
Check out my display.
A few close-ups.
German Santas and one of Christopher Radko's first issued candy containers
Some of my Santas are handmade. My husband carved the Santa on the top left for an Art class project in college. I made the little red wool St. Nick on the lower shelf.
I have several "Denise Calla" St. Nicks which are signed and dated. Denise went to grade school with me. She is a very talented artist. It seems hard to believe that a small town girl could create work that would become famous.
I set some of my "white" St. Nicks on a little antique cherry side table. One is a "Denise Calla", but the other two are St. Nicks that I made. The tall skinny one has a painted cloth face and a wool coat decorated with vintage braid. The more traditional woodland St. Nick has a porcelain face and is carrying a basket of vintage ornaments. I make my own little trees for my St.Nicks to carry.
An adorable celluloid baby rattle Santa
On my antique cherry table, I use a feather tree with a collection of vintage and handmade Santa ornaments. I use a piece of vintage garland for just the right amount of sparkle.
This is my favorite ornament, a vintage candy container. Candy was placed in the mesh bag before it was hung on the tree.
On to the next room with my Christmas decorating. Stop back to see the rest of my vintage Christmas decorations.
Sunday, November 28, 2010
More Creative Uses for Vintage Papers
Once I looked at the old vintage papers, I was inspired to continue creating.
I made vintage sheet music pinwheels and added silver and gold German Dresden snowflakes and added a glittered butterfly.
The ornaments look adorable on this lovely little tree made in Western Germany. I couldn't believe I found two of these trees on the shelf at the local thrift store for $3.00.
In among the sheet music was an old church hymnal from 1929. Many hymns were in Latin. I fashioned lovely little angel ornaments from the hymnal pages, folding the skirts and added vintage chenille pipe cleaners for arms. I used German scrap faces and beautiful gold German Dresden halos and wings. I made two sizes. A great place to get the German Dresden trims is Blumchen's. The on-line catalog has many wonderful supplies. When it comes to Christmas I love anything vintage and German. Aren't these angels adorable?
As I was folding paper, I realized I could fashion aprons. I used pages from my grandmother's 1934 cookbook and added some vintage cotton rick rack and ribbon apron strings. These became perfect ornaments for two kitchen trees. I used vintage tin cake pans for the stands, added my perky little apron ornaments on the branches. I had several old spice boxes, so I ran a piece of jute twine under the lid and made a few spice box ornaments. I made the little candy peppermints by cutting 1/2 inch strips of white and colored wool. I put on a little glue to hold the two pieces together and rolled the two pieces and secured the end with some more glue. All that was left was to attach a string hanger and hang these "no-calorie sweets" on the tree. The little "elf" perched on top of the tree is a wool ornament my mother made.
A plate full of the little "wool goodies" my mom created.
I hope to do a little holiday decorating this week. I love Christmas and will share all my holiday decorating ideas with you.
Saturday, November 27, 2010
A Leather Case of Vintage Papers
When my children were taking piano lessons, my mom brought me the leather case from my grandmother's house which was filled with sheet music and song books from my mom's and her sister's piano lesson days. As I was looking for inspiration for a Holiday Market I was doing, I decided I would create a line of decorations using the vintage sheet music.
Sheet music was used to make elegant topiary trees in vintage silver containers adorned with heavily glittered black and silver butterflies carefully punched from card stock. I added a little vintage tinsel for sparkle. Everything was repurposed in this project as I used paper packing for the moss in the topiary container. These trees would work with any style decorating because of their simplicity and understated colors.
I used Mod Podge to apply pieces of vintage sheet music to foam cones. For the "stem" I used a 1/2 inch dowel painted black. I secured the topiary into a vintage container using floral foam for silk arrangements and hot glue. All that was left was the addition of the simple black and silver butterflies. I used Martha Stewart's butterfly punch and punched butterflies from card stock. I used white glue and heavily glittered the butterflies on both sides. I scanned a punched butterfly to enlarge it and then I traced and cut the larger butterflies by hand.
Unfortunately the shoppers that day were only lookers so i have my beautiful topiary trees left to use in my holiday decorating.
Thursday, October 28, 2010
Sitting Pretty
This project is a combination of two of my favorite things to do, hand-stitched wool applique and repurposing vintage furniture.
I found a great vanity bench at a resale shop. The price was right and I saw possibilities. The first part of the process is securing old wool clothing, skirts, jackets, and yardage. Throughout history fabric was valuable so women used every scrap. Women would never think of discarding an article of clothing that could be refashioned or used for a household item. The tradition of wool applique grew out of a tradition called penny rugs. Women would trace large coins and "pennies" cut out the pieces and hand stitch them to a background to make decorative rugs for the hearth.
Finding clothing these days made of 100% wool is difficult. The clothing is cut apart and washed in the machine using hot water, detergent and a cold rinse to shrink the fibers of the wool together. The felting process prevents the edges from raveling when it is appliqued to the background. A color scheme is selected and a pattern is drawn. The pieces are cut from a variety of colored wool and then blanket stitched or tacked with small stitches to the background. Embroidery is used for detail work. All stitching is done with pearl cotton. Once I had the bench top completed, it was time to paint the bench. I primed it and painted it with two coats of my favorite red. Once the paint was dry, I distressed the edges and applied three coats of paste wax.
The last step was to tack the covering on the bench and glue on "gimp" to hide the raw edges. The transformation!
Perfect for a foyer.
I have been busy getting ready for a show in Kohler, Wisconsin on Saturday November 20th. It is held in the local high school. A great place to start your holiday shopping. I'll be posting my new projects as they are finished.
Sunday, October 3, 2010
Pretty and Pink
I know it is a bit early to start thinking about Christmas when everyone in blogland is thinking Fall and Halloween, but I created these lovely wreaths made from vintage balls in shades of pink, green, silver and white last week before we left for Minnesota. The wreaths are adorned with glittered glass ballet shoes and a sparkling tutu ornament. My daughter received three fabulous parts in the University production of the Nutcracker Ballet and so I made and donated the wreaths for a fundraiser that helps support the ballet. The Nutcracker Tea is in November but it was just easier to transport them by car rather than package and ship two fragile wreaths.
So Beautiful!
Wouldn't this one be perfect as a holiday decoration in a girl's room or hung on a mirror?
I visited a few resale shops in Winona over the weekend. I'll show you my finds later this week.
So Beautiful!
Wouldn't this one be perfect as a holiday decoration in a girl's room or hung on a mirror?
I visited a few resale shops in Winona over the weekend. I'll show you my finds later this week.
Thursday, September 30, 2010
The Big Reveal!
Remember that taxi cab yellow dresser that has been hurting everyone's eyes who viewed my blog?
You can't imagine what you can make with these things along with hours of work.
Here it is my version of Restoration Hardware's Zinc Chest
It is absolutely gorgeous. I am in the process of redoing my son's bedroom, so with limited funds I turned a "free" dresser into the perfect chest for a room with a French Industrial feel. The technique was a rather simple one that I saw on Miss Mustard Seed's Blog
I crinkled large sheets of aluminum foil and smoothed the wrinkles out a bit. Next I applied the foil to the dresser with mod podge, making sure the sheets were tightly adhered. A wooden craft stick was very helpful in firmly pressing down the foil. I should have probably primed the chest with gray primer because if the first layer of foil tore, the taxi cab yellow paint showed. So I applied another layer of foil to the entire dresser. I then applied two coats of mod podge over the foil. To give the dresser a feeling of zinc, I applied asphaltum glaze and blotted it off with paper toweling. The final step was the application of two coats of wipe-on poly.
This was the result.
The foil, mod podge, glaze and wipe-on poly cost was about $18.00.
I found the perfect knobs at Lowe's. They were a bit pricey at $48 for 12 knobs but then the Restoration Hardware chest was$1895.
Mary's Zinc Chest Priceless!
We're off tomorrow to visit my daughter in Winona, Minnesota. this is the first time we will see her since she left for college. I can't wait. I miss her so much. I'll accessorize the dresser next week. Stop back to see the great vintage finds that I found to go with the dresser.
Saturday, September 25, 2010
A Flashback to the Seventies
I have a surprise in store for you!
I have been working on a transformation you will not believe. My friend unearthed this dresser in her basement. If I looked beyond that taxi cab yellow paint I thought I could redo it for my son's bedroom. I always think big so this project has taken me several weeks.
But it is almost time for the big reveal. Stop back tomorrow. I know you will be truly amazed!
Monday, September 6, 2010
Getting Back in the Groove
I can't believe how unsettling it is to have one of your children out of the house. My daughter has spent her first week at college and has made a great adjustment. I am not certain her mother has made the same adjustment. What does a mother do who is missing her daughter? Plan a trip to Goodwill or visit an Estate Sale.
I snatched up this great little silver tray and vintage millinery flowers.
This is the most beautiful bottle opener ever! I love grape patterned silverplate.
I found this wonderful wooden tray which I am going to paint white and distress. It will become the foundation for a great shabby table display.
Lastly, I was creative with a few of my vintage finds. The cake stand and cloche are part of my collection. With a little inspiration from a photo from Jeanine's blog at Chippy Shabby, a few of my recent vintage finds and a little natural material, I created this awesome still life. The variety of whites and creams are just the right combination for the naturals and silver pieces.
I plan on being more creative and focused this week. Check back to see what I have done.
Monday, August 23, 2010
Family Photos and Cozy Cabins
This past Sunday was our last weekend together as a family before my daughter leaves for college. We decided to take a drive to Door County and have a picnic lunch. I just wanted one more great photo of the two kids together. But as you can see it wasn't going to be. Taking photos of teens is just as difficult as photographing toddlers. When one smiled the other squinted. One wanted their picture taken, the other thought I was nuts. This was the result, but I have a photo and wonderful memories. I couldn't ask for any more. Our family excursion gave me time to dream as well as enjoying my family.
I am longing for a place to design, repurpose and create. A place I could call my own. Inspired by My Shabby Streamside Studio I have been dreaming of my own beautiful cottage. Door County is filled with adorable possibilities.
Possibility? The plastic chairs would have to go.
I have always dreamed of a log cabin nestled in the woods just like this one.
A fixer upper with tremendous possibilities.
It even has two floors. If you look closely you can see how the logs were put together to support the floor of the upstairs. My husband says too much work and too much money. Oh well, I might have to settle for this!
I might just have to see the possibilities in the little shed we already have on out property. It is located in the woods on the back of the property, but perhaps it could be moved and restored. It has knotty pine paneling which I would paint white of course, wonderful wavy glass windows with adorable shutters and a welcoming front door. It would need a new floor and lots of scrubbing to get rid of mold and mildew but it has possibilities. What do you think?
Thursday, August 19, 2010
A Visit to Chippy Shabby
Jeanine of Chippy Shabby always finds the best accent pieces with great form and just the perfect amount of "chippiness". I paid her a visit on Tuesday.
I love her blog and one day as I was carefully studying her pictures I noticed the most gorgeous lamp. I knew it would be perfect on the little red table in the den directly off my foyer. I have a fabulous red and white toile wallpaper in the foyer.
The most beautiful lady!
A perfect match with the toile wallpaper.
My lady sitting on her shabby table. The altered art busts on the shelf below are from Viva la Cottage in Sister Bay, Wisconsin.
Look at this fabulous chippy, rusty wall sconce I found in Jeanine's wonderful stash. I knew it was meant for my sunroom.
It hangs above this lovely cabinet which I purchased from Jeanine two years ago. After stripping the cabinet and deciding I didn't like the walnut color in the room, I painted it this great shade of apple green, distressed it and gave it two coats of paste wax. The cabinet was made in 1849. The date was etched in the door.
I also picked up this great metal glass carrier. This will look so cute on my patio table when I am serving lemonade. The red gazelle glasses are just right in the rack. I collected them one by one over a period of years.
As I said, Jeanine always has just the perfect piece!
Subscribe to:
Posts (Atom)